
Guide for Hobbyist Authors, pt. 4
No it's not time to hit 'publish' yet! First: PRE-PRESS!

Hey y’all, it’s KimBoo! I’m an author and a podcaster who is also a librarian, text technology historian, and former I.T. project manager. I write about a lot of interesting things, I hope you agree! Please consider supporting me (and my dog!) so I can keep throwing errata & etcetera into the Scriptorium! Find my fiction at the Bibliotheca!
This is the fourth post in the Hobbyist Author Guide series; please read the initial overview to see where we’re at and where we’re going!
Part 4: Pre-press - You are here!
(Originally I was just going to have one post covering “how to publish your book” as a whole, but as I got into it, I realized that it would be very long. It made more sense to divide it into two sections instead, with this post being about the “pre-press” part of the process. It’s still very long, though. Sorry.)
What is pre-press, you ask?
All the fiddly parts of publishing a book that happens between finished edits on the manuscript and putting the book up for sale.
Most people who are unfamiliar with the publishing industry don’t put much thought into covers and formats and editions, as they tend to be things you take for granted. Of course your book has page numbers! Of course your epic fantasy story has a dragon on the cover! Of course you have ebook, audio, print, and large print editions! Like it’s hard?
To be honest, it’s not hard. But that does not mean it’s simple! Getting your book ready to be released into the wild requires a lot of important steps, some of which you probably did not account for (before reading this post, that is!).
Let’s start by asking what you want to end with. I know, you think that’s the easy question (“a book!”) but it’s got a few variations.
Back to the beginning: what is the purpose of this book?
If you want to have fifty printed copies of your family history to hand out at the reunion picnic but you don’t care much about having it as an ebook people can buy online, then your process is going to look very different from someone who wants their fiction novel in all the stores.
There is some overlap no matter what your answer is, but it will have a major impact on important aspects. Here are some examples of paths you can take:
A printed hard copy to sell/give away to family and at regional festivals (paid for upfront and printed via a service such as Lulu.com or Canva. You can use Kindle Direct Publishing (KDP) or IngramSpark for this, but they are not as user friendly).
An ebook you can give away as a “freebie” to get people to sign up for your newsletter (depending on format, such as PDF or ePUB, this can be designed using publishing software with no need to go through a publishing service). A lot of business entrepreneurs do this to bulk up their email list.
A book that is for sale in all the retail stores (Amazon, Kobo, Barnes & Noble, etc.) and is available in multiple formats (ebook, paperback, large print).
A special limited edition printed hardcover funded via crowd-sourcing (Kickstarter, etc.)
It’s possible to mix and match those options, such as giving away the ebook to subscribers while also funding a special print edition using Kickstarter. There are no rules here, which is why I put so much stress on “start with the end in mind!”
I’m going to break it down in sections: editions, formatting, and covers.
BUT FIRST: A WARNING
There are a lot of companies out there who say they are “publishers,” who offer to do all the hard work of putting a book together for you for a convenient not-so-low fee. Sometimes they even throw in editing services and cover design services.
All too often, such companies are just modern “vanity presses.” While there valid assisted self-publishing services out there who can do all of these under one roof, vanity presses are not that. They charge high prices and provide you very little quality for it.
For a much longer, in-depth explanation on the differences between vanity presses and assisted self-publishing services, visit the excellent and well-respected site Writer Beware. They also have a blog that keeps you up to date on new scams targeting authors.
Okay, with that said, let’s get down to brass tacks, starting with:
Editions
A book edition is just a version of the text, including ebook, paperback, hardcover, large print, and audiobook. A lot of authors also do “special editions” which are fancy hardcover books, usually with embossed covers and “sprayed” (decorated) edges and ribbon place holders. Those are expensive and expensive to produce, so usually they are not the initial “go to” choice to publish. But you do you!
All decisions from here on roll out from the editions you decide to print. At the pre-press stage, this determines how many different versions of the interior formatting are needed, and how many versions of the cover. We’ll get to that eventually, but for now, my advice is to keep it simple. Most hobbyist authors are well served with an ebook version and a paperback version. If you plan to put a book up for sale, then you should probably include a large print version of the paperback as well. Some printers offer hardbacks using the same formatted files as the paperback version, so check for that.
BEFORE YOU START
You have a finished manuscript, and you think you are ready to start formatting, but you are not. You will need things you never thought of, so go over this checklist:
Title
Subtitle
Blurb for the back cover of the print edition
Author bio to be included in the book (usually in the end matter)
Short author bio for the back cover (not required, but common)
Copyright information
Extras you may or may not need: Acknowledgments, dedication, preface, bibliography, references, index
Once you’ve nailed all of that, it’s time for:
Formatting
“Formatting” a.k.a “typesetting” is everything between the covers! Different editions all need different formats, because what looks good in an ebook might not look good in print.
Aside: Generally, “formatting” tends to refer to creating a full ebook, while “typesetting” refers to laying out the interior of a print version. These days, though, the terms are often used interchangeably. (Sorry, typesetters!)
Even after all my years of experience in publishing, I learned the hard way how easy it is to just gloss over important elements. I published a non-fiction book about writing craft and the ebook contained a fair amount of live links to websites and apps (that is, links readers could tap or click on the link to visit the site). I used the same basic file to create the printed version, and it wasn’t until a reader complained that she had no way to get to the links mentioned in the printed book that I realized I had not provided any resource listing the URLs for those links. You can tap a printed page as much as you like, but a website will not materialize in front of you!
These days, all my non-fiction books include a URL which readers can type into a browser that leads to a webpage containing the links listed in the book. It’s an extra step I only need to do for the print version, but it’s necessary. If I had spent a few moments thinking about the different editions I needed, I probably would have done it from the start.
Once you know the editions you want formatted/typeset, you are ready to:
Hire it out.
DIY it.
I’m going to be honest with you upfront: I highly suggest hiring it out. I’ll have some DIY advice down below, but if you are not going to be publishing more than one or two books, the time and money you need to invest in going the DIY route will be outsized to what you would pay to have someone else do it. Even if you are MS Word master and/or a well-seasoned computer programmer, there are hurdles to the DIY route you never planned on.
That said, let’s break it down!
If you hire it out, look at gig sites (Fiverr, Upwork, etc.) to find professional formatters/typesetters. You do not need to go through a publishing service, in fact, I highly recommend against it as all too often they are just vanity presses with a veneer of respectability (see the warning above, if you skipped it!).
Make sure whomever you hire is familiar with formatting books, not just brochures or pamphlets, and in the editions you need. Ask them what software they are using, as well. Answers should include one or more of the following: Adobe InDesign, Affinity Publisher, Vellum, Atticus, and Sigil. There are other formatting programs out there, but those are the most common. If they only list Canva, for instance, then they are not book designers.
Costs vary wildly depending on the experience of the designer, but as with all things graphic-design related, I do not suggest going for the cheapest option because you will definitely get what you pay for. Also, if your book contains a lot of graphics (photos, infographics, illustrations) expect to pay more for the formatting—dealing with images is always a hassle, and formatters earn their keep with complicated work like that!
Most formatters will ask for details about what you are looking for, both in regards to the different editions you need and the aesthetics/style. You might not think too much about how the interior of a book is styled, but next time you are at a bookstore put a few disparate books side by side and you’ll notice subtle differences between genres like literary fiction, YA novels, and self-help. You don’t need to know a lot about fonts or art history here, but have a few ideas at hand to set the vibe: professional; whimsical; modern; vintage; etcetera.
You’ll usually get one or two revisions included in the price, but that means you need a good idea before you hire the formatter of what you want. Being able to provide them with the names similar books in your genre or books that you want to emulate is a great way to reduce the number of revisions (and being charged for extra revisions!).
If you are determined to DIY it, there are several ways to go…and none of them are MS Word.
“But KimBoo!” I hear you say. “I am a whiz at Microsoft Word! Surely this will be easy-peasy lemon squeezy!”
While it is possible to create a viable print-worthy PDF out of MS Word, it’s also a lot more difficult than you think it is (if you aren’t a master of such techniques such as using styles and sections, please don’t even try). As for getting an ebook, it’s not worth the effort. I don’t care how pretty you made the text or how much time you spent on the headers/footers/images, that is not “formatting” in the true sense of the word!
Yes, I know, I know: Amazon and other platforms allow you to upload MS Word files and promise to deliver fully formatted books. Trust me when I say that the majority of time, the output is substandard at best.
If you are determined to go the way of MS Word, then I salute you. ( ̄^ ̄ )ゞ
So, then, what are your other DIY options?
Professional indie authors like me often use specialized formatting software like Vellum, Jutoh, Atticus (not recommended), Affinity Publisher, or Adobe InDesign. However, if you are not going to be publishing more than one or two books, they are not worth the price or the learning curve. Writing software like Scrivener (which, as you probably already know, I love dearly!) offers ways to “output” files in publishable formats, but I gotta say, they are not very user-friendly about it. I have used Scrivener for over 15 years and I still screw up compiling every single time. *sad trombone*
There are some options for you to try, however. They won’t give you a lot of control over features or layout, but if you’ve got a book with a straightforward structure (that is, you don’t have a lot of sub-headings or fancy pullouts) they might work for you:
Reedsy Studio (free formatting service that is part of the Reedsy writing app)
Kindle Create (free app from Amazon; I’ve heard mixed reviews on it, but a lot of people use it very successfully)
Jutoh (low-cost app for formatting books; a little old school, and it helps if you know a bit about programming and HTML, but does a lot for the price)
Sigil (free formatting tool for ebook files such as EPUB; however, you must have some familiarity with HTML coding to use this program successfully)
Canva (low-cost graphic design app; not viable for ebooks, but you can layout something short such as children’s books as a PDF for hard-copy print version)
Covers
Most people think of a book cover as a single image, and they aren’t wrong, but also, they are 100% wrong.
Every edition of your book needs a separate cover, and while they should reuse graphics and elements in order to visually represent the same book, on the production side they are very different. What do I mean?
Ebook “covers” are just rectangular digital images that you would normally associate with the front cover of a printed book, a.k.a. the front piece.
Printed books need wrap-around covers, that is, a front piece, a back piece, and a spine. The back usually has a description of the book and an author bio, and the spine will usually have the title, author name, and (if applicable) the publisher logo.
If you are doing something fancy, like a hardcover with a book jacket (a paper wrap around), it also needs inside flaps. (Usually, the actual book has a very different front piece, backpiece, and spine than the book jacket so it’s two-for-one cover time!)
Audio book covers are square versions of the ebook cover/front piece.
Large-print printed books need a wrap-around cover with larger print (duh) but also some indication that they are a large-print book, usually with a banner or badge on the front.
Here are example of ebook, audio book, and paperback covers for my book, The Queen’s Aerie, side by side:
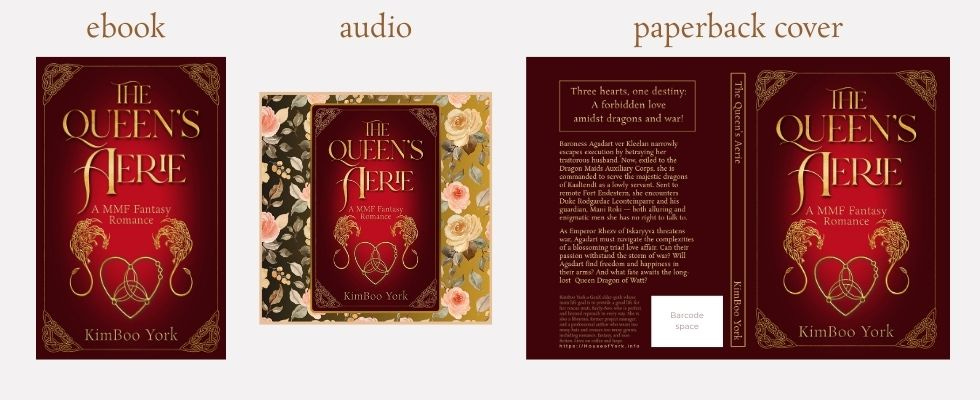
(You’ll note I “cheated” by just slapping the ebook cover into a square design for the audiobook/podcast! That’s not best practices, usually you want to design something that looks more like a square version of the front piece, but eh, sometimes you’re in a crunch for time!)
The funnest part of this is, of course, figuring out the front piece. If you don’t have much graphic design background, I highly suggest looking at other books in your genre/field to see what they look like. Indie authors like me spend a good deal of time analyzing the top 100 books in our genre to see what is popular (dragons for fantasy? Shirtless men in cowboy hats for Western romance? Crowns and crows for romantasy? Lots of brightly colored arrows and big print for business books?).
Of course, the cover can look like anything you want, and if you aren’t worried about sales, then doing something “not to market” doesn’t matter. It’s up to you!
That said, book covers are another pre-press element I suggest you hire out. There are a lot of good book designers out there, but I would caution you to look for one with some references because there are also a lot of marginal graphic designers who think they can design book covers.
If you are determined to DIY your cover, first make sure you know the requirements for the edition you are publishing. Each type of cover has a size requirement:
Ebook: 2,560 x 1,600 pixels is the standard, but honestly I always do mine at 2,560 x 1705. I have no idea why that seems to work better across distribution platforms, but 30 years working on websites has taught me not to question the mysteries of image sizing.
Audio book/podcast: 3,000 x 3,000 pixels. This was a standard set years and years ago by Apple and so here we are, please do not question the man behind the curtain.
Print books: The size depends on the sizing of the book itself, including factors such as trim size (the measurements of the finished book) and number of pages (more pages = thicker spine). Most publish-on-demand services such as ‘zon and Draft2Digital and BookVault will give you a template in PDF form once you’ve uploaded your print edition manuscript, which you can use as a layer in photo apps or Canva to build your cover design around.
Designing a cover is an art form, but it can be fairly simple if you use a program like Canva that has templates you can riff off of. You’ll probably need some graphics no matter what you use to create the cover, though, which brings me to:
WARNING: Make sure that you have the licensing rights to graphic elements you use, including photos, illustrations, and fonts. Too many amateur authors have published books with images they pulled off of Pinterest or a google search and then gotten themselves sued by the actual rights-holder of the image.
A professional book designer will include rights/licensing in their design contract. If you are DIY-ing your cover, check the license on the graphics from wherever you get them, such as stock photo and graphics sites like DepositPhoto, CreativeMarket, or AdobeStock. If you use Canva, most of their graphics have a business license for publishing, but do yourself a favor and double check.
And finally, a word on AI-generated book covers: They aren’t all that. You can get some elements out of AI that you might use on a cover, but most people doing so are “photobashing” the output in Photoshop or Affinity Photo to create cohesive covers. Maybe in a year or two, there will be a decent AI-driven book cover design app, but I’m not holding my breath. Humans are still the best book cover designers!
Ready, Set, GO PUBLISH!
To be honest, I could write another 3,000 words on the pre-press process. If you are really interested in creating a beautifully designed book, there are a lot of resources online to reference. One blog I really love to follow for ideas and insights is cover designer Nathaniel Roy, who does a lot to demystify the cover creation process.
But, once you have formatted files ready to go, it’s time to publish!
The next (and final!) part in this series is all about publishing. I’ve touched on a few aspects here but in that post I will go into further detail on your options, the pros and cons of them, and how to simply your life as a hobbyist author!
If you have any questions please leave a comment!
Find KimBoo: Notes • Bluesky • Tumblr • Facebook • House of York
Support Keely!!! 🐶: Ko-fi • PayPal